Using the enhanced MOT Diary

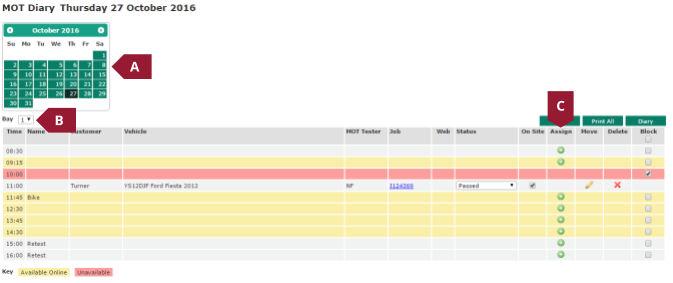
- Calendar – Clicking a day will cause the main diary grid to display the entries for that day
- Name column – Slots can now be named, allowing certain slots to be designated for certain purposes, such as retests. See the Creating diary slots section for more information on naming slots
- Job number – displays the document number of the job linked to the MOT, clicking the link will display the job in the Document tab
- Status column – Shows the current status of the MOT, this can be changed using the dropdown menu
- On site column – Checking the box against an MOT appointment will mark the vehicle as “On site”. Key tags can also be assigned and viewed.
- Assign column – Clicking the green + button on an empty row will allow a new appointment to be created directly from the diary
- Move column – Clicking the Move button against an existing appointment will allow it to be rescheduled to a different slot or swapped with an existing booking
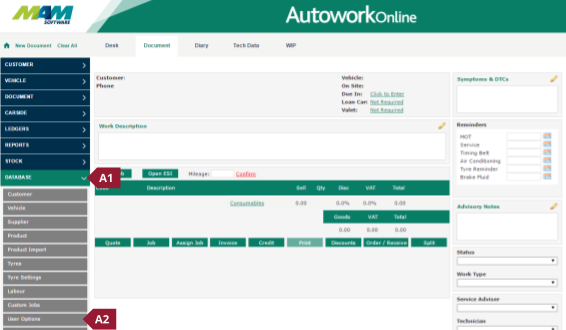
- Click the Database menu (A1), and then the User Options menu item (A2)
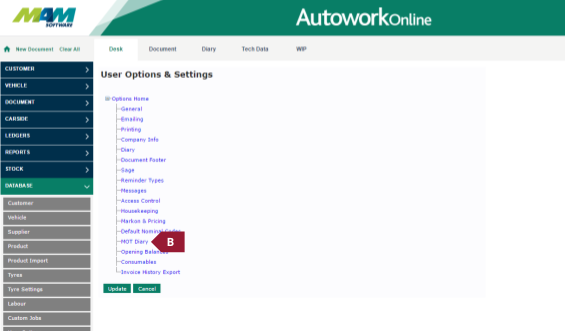
- Click the link for MOT Diary
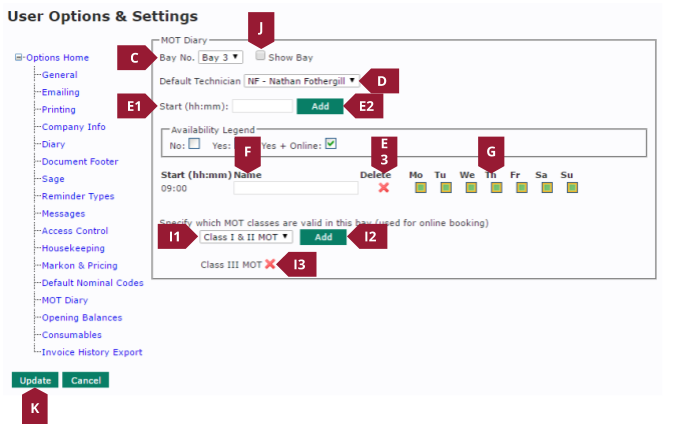
- Select the bay you would like to set up from the Bay No dropdown menu
- Select a Default Technician from the dropdown menu
- Type a start time for the slot into the Start box (E1) (formatted as HH:MM), and then click the Add button (E2), any slots added can be removed by clicking the Cross button (E3)
- Optional, type in a Name for the slot
- Click the Availability checkboxes for each day to toggle their availability between: Unchecked – Not available, Checked – available offline, and Checked with green highlight – Available on and offline
- Repeat steps E to G for any additional slots
- Select the MOT Classes that can be performed on that bay from the dropdown menu (I1), then click the Add button (I2) to add them to the list. Entries can be removed by clicking the Cross button (I3)
- Check the Show Bay checkbox to display the bay in the Diary screen
- Click the Update button to save the changes
- Use the Calendar to select the date you would like to create the booking on
- From the Diary screen, click the Assign button against the slot you would like to book the MOT into
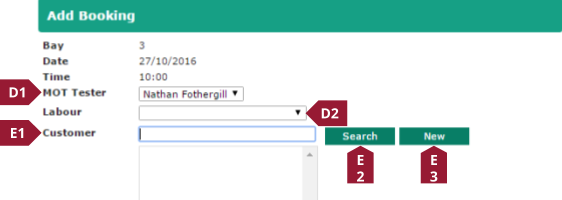
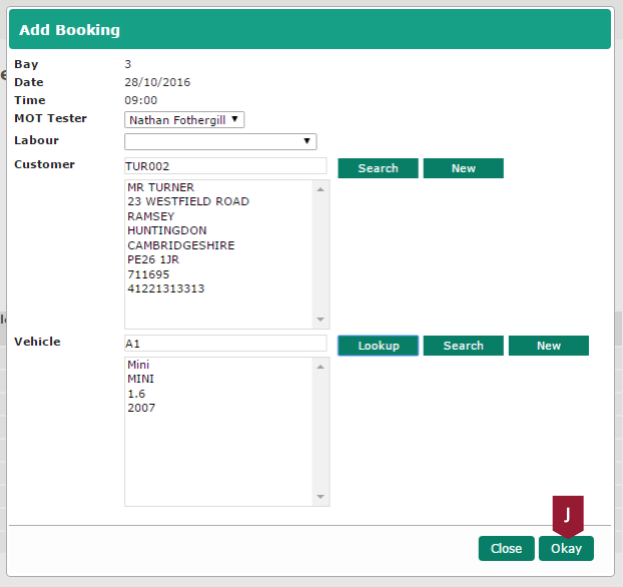
- Select the Bay you would like to use for the booking
- Select an MOT Tester (D1), and Labour (D2) from the dropdown menus
- Enter a Customer account code (E1), and click the Search button (E2) to search for an existing customer, or the New button (E3) to create a new one
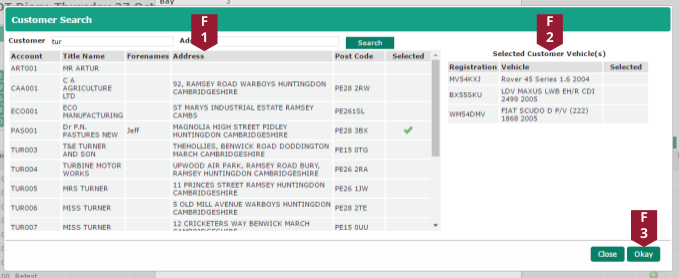
- If an existing customer has been entered, you will be presented with the following screen, where the Customer (F1) and then Vehicle (F2) can be clicked to select them, before clicking the Okay button (F3) to confirm the selection
- If the New button was clicked, the following screen will display, allowing for the customer’s details to be entered, when the Add Customer button is clicked, the new customer record will be created

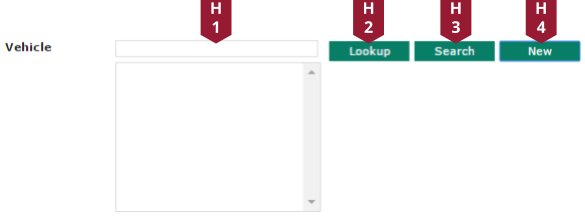
- If a vehicle was selected in the previous step, it will automatically populate the vehicle details section. However, a new vehicle can be added using the following process: Enter a VRM into the Vehicle box (H1), and then click the Lookup button (H2), the vehicle details will automatically display. If the vehicle already exists on the system, click the Search button (H3), and then select it from the list, and if the vehicle needs to be entered manually, click the New button (H4).
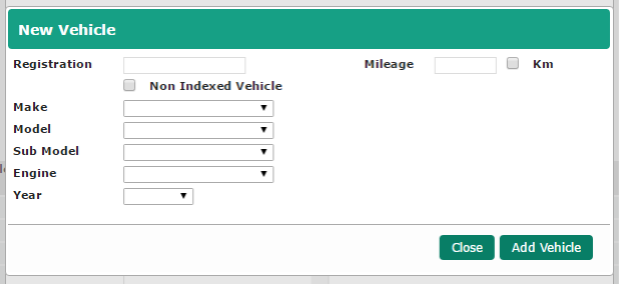
- If the New button is clicked, the New Vehicle screen will pop up. Fill out the relevant details, and then click the Add Vehicle button to add the vehicle to the database
- When you are happy with the settings, click the Okay button to create the appointment
Deleting appointments
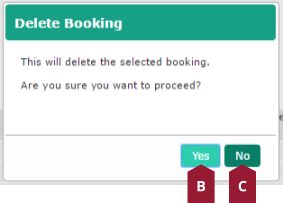
Existing MOT jobs can easily be removed from the diary using by clicking the Delete button (A) against it.

You will be presented by a prompt, clicking the Yes button (B) will delete the entry, whereas clicking the No button (C) will return to the diary screen without deleting the entry.
Rescheduling appointments
It’s possible to easily move an MOT appointment to a different slot, or swap it with another appointment. This can be done using the following process:
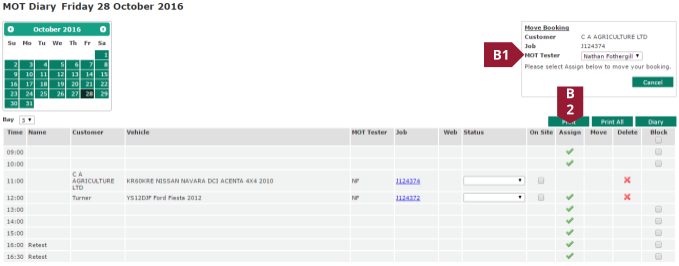
- Click the Move button

- If you would like to change the technician assigned to the job, this can be changed in the MOT Tester dropdown menu (B1). Click the Assign button (B2) against the slot you would like to move the appointment to, and the job will be moved
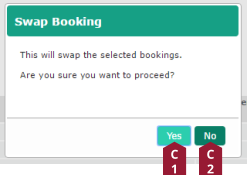
- If you attempt to move the appointment into a slot that is already populated, the following message will display: Clicking the Yes button will swap the position of the two appointments, whereas clicking the No button will leave the schedule unchanged.
Changing a job’s status and marking it as “on-site”
The job associated with an MOT booking can be marked as on or off-site by checking or unchecking the On-Site checkbox (A).

Updating an MOTs status
The Status column on the MOT Diary screen can be used to set and display the MOT’s pass or fail status. The column features a dropdown menu (A), where a status can be selected.

Viewing the job card associated with a diary entry
The job card linked to a particular diary entry can be opened by clicking the document number in the Job column (A).
