Using Work in Progress (WIP)
Introduction
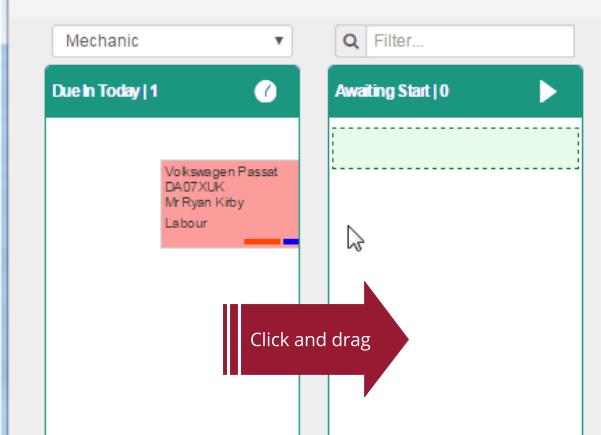
The Autowork Online Work in Progress (WIP) tab allows you to easily view information on currently outstanding jobs and invoices. The documents are sorted into a set of customisable columns, one for each particular status, and the status of a job can quickly be changed by simply dragging and dropping it with your mouse. The WIP screen also offers selectable view templates, these are fully user-customisable, and can be used to set a selection of status codes specific to a particular job role.
Benefits
- Customisable views – see the status of all documents relevant to you at a glance
- Simple, clean user interface – easily and efficiently manage the status of jobs
- Automatic key tagging facility – easily keep track of your customers’ keys
- Valeting options – automatically advise staff where a vehicle needs to be valeted
Configuration
Please note: Work in Progress requires configuration before it can be used. Please refer to the Work in Progress setup guide for further information.
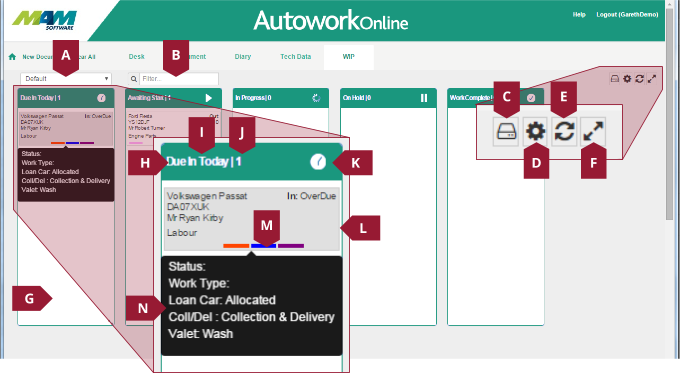
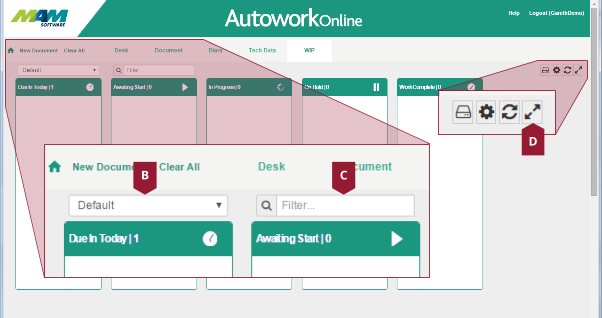
- WIP template selection dropdown menu
- Filter text field – can be used to search on various fields, for example, a customer’s name.
- WIP template settings button – access the WIP template settings
- Settings menu button – select which status codes will display in the selected WIP view
- Refresh button
- Fullscreen button
- Status code pane header – contains the status code name (H), the number of items that currently have that status (I), and status code icon (J)
- Document – contains the details of a job or invoice
- Status colours – show the current status of the document, from left to right these are: Overall status code, valeting option, loan car option, and collection option.
- Document details popup – shows various extra details for the job when the user rolls their mouse over the status colours
Viewing outstanding documents in WIP
- Click the WIP tab in the tab bar.

- Select the relevant template from the Template Selection dropdown menu.
- Optionally, click into the Filter text field, and enter a search phrase (for example, a customer’s name) to filter out specific documents. This filter can be reset by clicking the Refresh button.
- Optionally, If you wish to view the WIP screen in fullscreen, click the Fullscreen button.
- To view a basic summary, simply hover the mouse pointer over the Status Code Colours at the bottom of the document’s entry on the status code pane. A summary of the job details will be shown in a small balloon pop up.

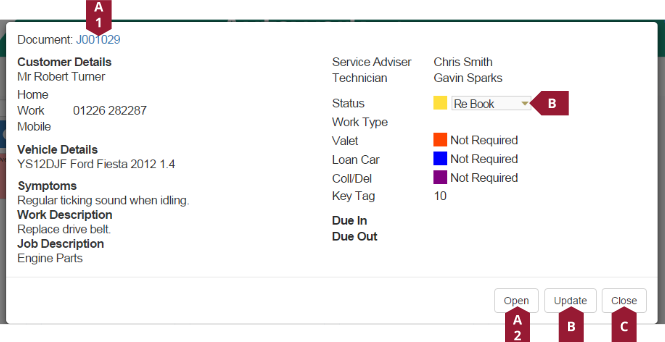
- To view the document in full, double-click the entry on the Status Code Pane, this allows for various other options:
- Click either the Document Number link (A1), or Open button (A2) to open the document in the document screen.
- Select a new status from the Status dropdown menu (B), and then click the Update button (A2) to change the status.
- Click the Close button to close the document details popup.
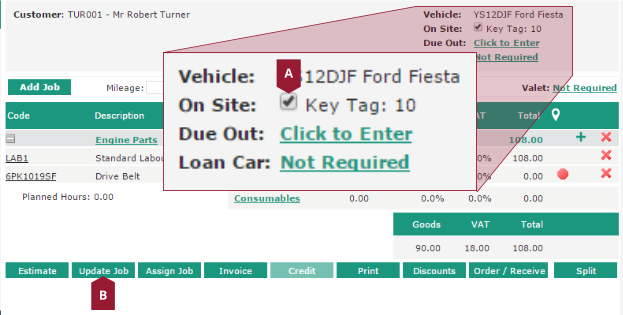
For jobs
- From the Document tab, uncheck the On Site checkbox.
- Click the Update Job button.
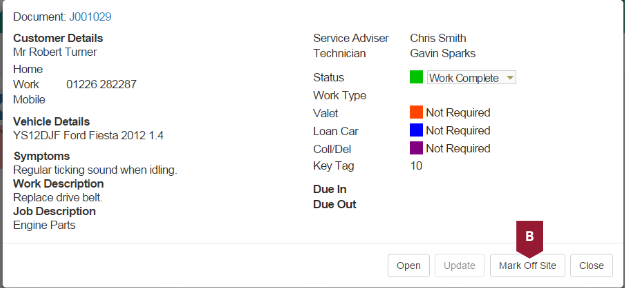
For invoices
- Double-click the invoice in the main WIP screen.
- Click the Mark Off Site button.
Please note: If the Mark vehicle off site when invoice created option is enabled, this step will not be required.
Key tagging
When a customer checks in their vehicle, it may be desirable to add a numbered tag to their keys, so that they can be tracked. If this feature is set up, it will work as follows:
- When a document is moved from a status code that has its WIP category set to “Pre-arrival”, to one that has it set to anything else (for example, “Awaiting Start”), a Select Key Tag prompt will pop up.
- Select the radio button for the required tab, or select No Tag if a key tag is not required. Note that key tags are predefined within the database menu, there is no way to add a tag via WIP, please refer to the Autowork Online – Work in progress (WIP) setup guide for further information.
- Click the Select button to save the changes, or the Close button to cancel.

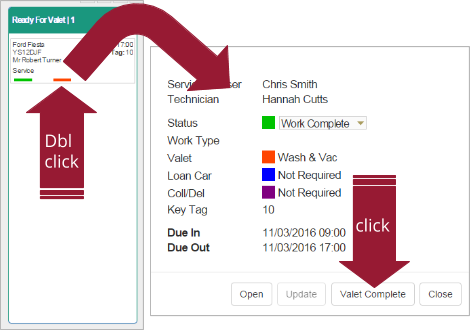
Valeting
If a document has a valeting option set against it, it will automatically be added to the Ready For Valeting pane within WIP. Once valeting has been completed on the vehicle, it can be removed from the Ready For Valeting pane by double clicking the document, and then clicking the Valeting Complete button.