Returns & the new Returns Bin
The Returns process for parts has been improved, including the introduction of a Returns Bin. The Returns Bin records details of all parts awaiting return to each supplier until you are ready to return them. Returns can then be created quickly and easily for each supplier and tracked through to completion and credit. The aim is to simplify the returns process and save time, while maintaining an accurate audit to help keep track of parts and minimise losses.
Adding parts to the Returns Bin
Key to the returns process is recording which parts need to be returned by adding them to the bin. This can be done in 3 ways; When deleting a part from a job, directly from a GRN or manually.
Other than the manual option, you can only return parts that have been ordered and received. Tip: If you are not ordering parts through the system you can still Receive them using the Order / Receive screen. This will create the Purchase order retrospectively and set up the supplier link needed to return parts and maintain a full part audit – it’s worth doing.
Returning a part from the Job
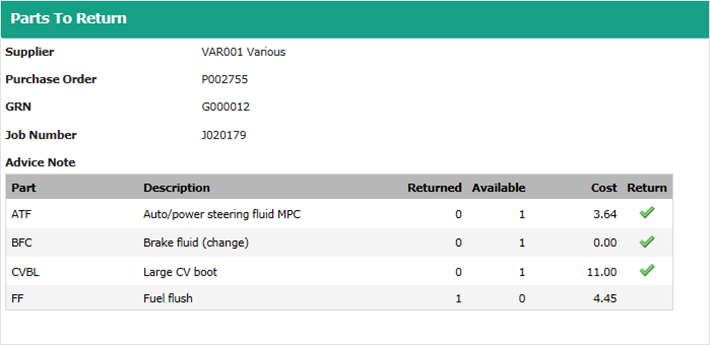
This is the simplest method to record parts for return. When a part has been received from a supplier, a green tick is shown on the Document screen.
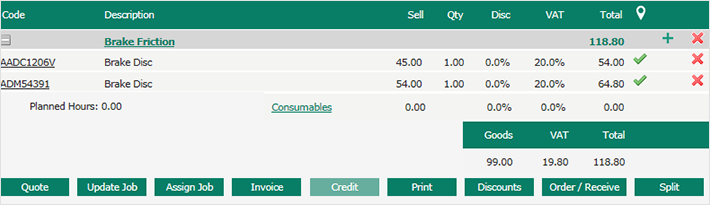
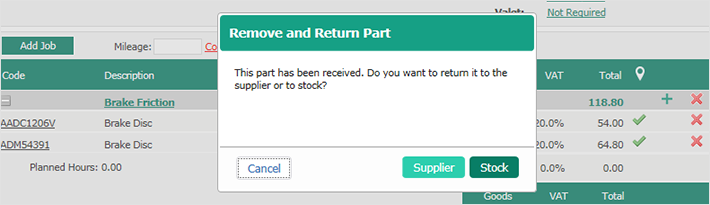
When you delete a received part by clicking the X you will now be asked if you want to return it to Stock or to the Supplier. Choose Supplier if you want to return it.
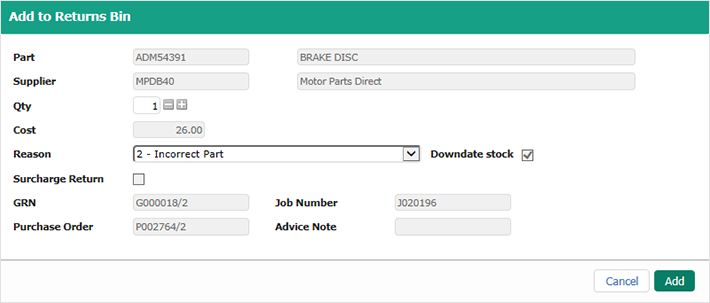
The Add to Returns Bin pop up will open. Other details about the part to be returned will be filled in automatically from the Purchase order. Select a reason and click Add to add the part to the Bin. (Returns Reasons can be customised in the Codes screen).
Returning a part from a GRN
If the Job has already been completed, or you wish to return a stock order, find the GRN in the My Orders screen and click the green tick under return. The parts on that order will be displayed. Select which part you want to return by clicking on the tick, which will open the Add to Bin pop up. You can repeat this for each part on the GRN you wish to return without leaving the screen.
Adding a part to the bin manually
From the Returns Bin screen itself (under the stock menu) simply click Add. The Add to pop up will appear so you can enter the part details manually. This pop up now also has a search facility for the part and supplier to make finding a stock part easier.
Removing a part from the Returns Bin
When a part is added to the bin it is removed from the ‘On Hand’ stock value, a stock movement line will show the part being taken out of stock and put into the bin.
A part can be removed from the Returns Bin by clicking the X next to it. To ensure parts can be audited, If a part is removed from the Returns Bin, it will be returned to stock. A stock movement record will be written
The Returns Bin
When you are ready to create a Return for a supplier, simply open the Returns screen from the Stock menu. The Returns Bin tab is displayed automatically.
The Returns Bin screen shows you all the parts that should be awaiting return in your physical returns storage location.
If you have a lot of parts awaiting return, or are returning parts for a specific reason (e.g. Warranty) you can use the drop down filters. You can print this list for stock checking if required.
Creating a return
Click on a supplier to select all their waiting parts, or select the ones you want to return individually.
Note, you can only create a return for one supplier at a time.
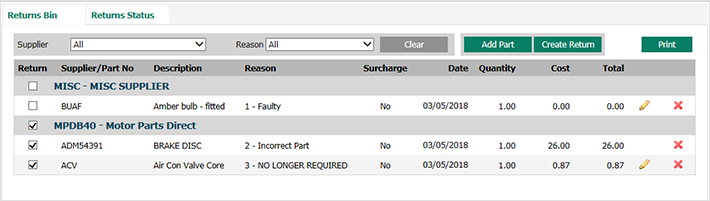
Once the parts have been selected, simply click Create Return. On the New Return pop up, review the parts being returned, add any notes for the supplier then click created. A returns note will be generated for you to print and include with the parts, or ask the collection driver to sign.
When a Return is created, the stock movement line created when the part was first added to the bin will be updated with the Return Note reference.
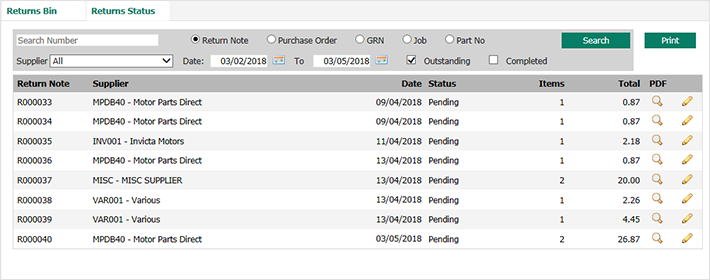
Return Status
Click on the Return Status tab to view your outstanding returns. You can search for a specific or a completed return using the search and filter options at the top. The print button will produce a report of the returns displayed according to the current filter options set.
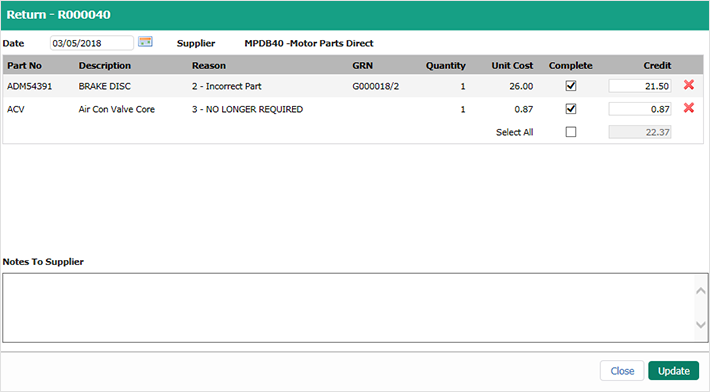
Complete or edit a return
Click on the Edit icon to edit or complete an open return. Parts can be deleted (these will be put back into the Returns Bin) or can be marked as Complete. You don’t need to complete all lines on a return at once. You can also edit the Credit value if it is different from the original cost.
Click Update to save your changes.
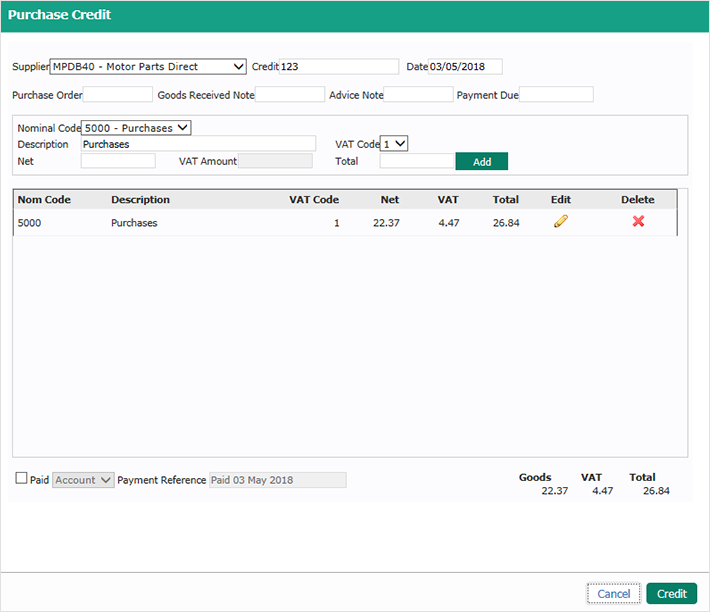
Credit a return
If the supplier has issued you a credit note and you wish to record this, enter the Credit number when prompted. You will then be taken to the Purchase Credit entry screen. The Supplier and Values will be auto populated, but you can amend these as required. You do not have to enter the credit, but doing so will link the credit to the return for future reference.