Using Job groupings
Benefits
- Increased efficiency – the new layout results in a quicker, easier to use workflow
- Cleaner, easier to read documents – all parts and labour for a task are grouped together
- Blank – Inserts a new blank job group
- Jobs – adds a pre-defined custom job
- Labour – adds a labour charge
- Repair times – add a OEM-supplied labour time from the catalogue
- Service – add a service schedule
- Parts – add a part
- Quick parts – quickly add part from a list of commonly sold items
- Catalogue – add a part from a catalogue lookup
- Tyre sales – look up and add tyres to the document
Please note, even though the new feature has been added, all of the above items (other than “Blank”) work in an almost identical way to the old version of Autowork Online. It would be possible to use the new system in a way that is very similar to the old system. This would be achieved by creating a new job group, and then manually adding parts and labour to it. Even though it is possible to use the system in this way, it is not recommended, as making full use of the new features will prove more efficient once they have been learned.
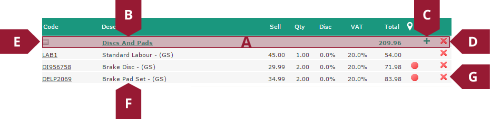
- Job header
- Job description
- Add button – adds a new item to the job
- Delete/defer job button – deletes/defers the whole job
- Minimise button – collapses the job
- Line description
- Delete item button – deletes the selected item only
- In the new system, the Add Job button replaces the separate buttons for Jobs, Labour, Repair Times, Service, Parts, Quick Parts, Catalogue, and Tyre Sales. Clicking the Add Job button (A1), will open a menu (A2), clicking any option within the menu, and then going through the same process as on the old system will add a job grouping of the desired type. For example, selecting the Jobs option, then choosing a pre-set quick job for changing brake pads and discs will add a job containing the required parts and labour.
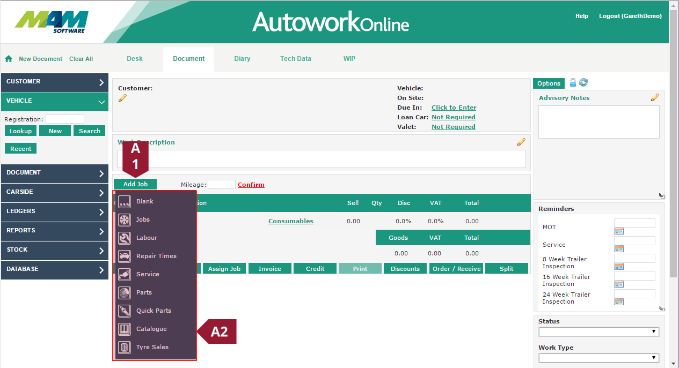
- The only exception to the above is the new Blank option, this adds a blank job group, which can be added to using the instructions in the Adding an item to an existing job group section. To add the new blank job, click the Add Job button (A1), and then select Blank (A2) from the menu
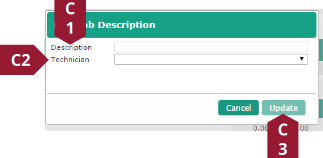
- Enter a description for the job into the Description text field (C1), select the technician assigned to that particular job from the Technician dropdown menu (C2), and then click the Update button (C3) to add the blank job.
Adding an item to an existing job group
To add an item to an existing job, simply click the Add button in the Job Header (see the Job grouping screen elements explained section for details) this will open the Add Job menu, and items can be added using the same process as in the Creating a new job group instructions.
Please note: Since the new Package Jobs feature was added in version 175, it is no longer possible to add a Job
in this way. This is because the Package job must be kept on its own separate job group in order for the pricing
to be correctly calculated.
Moving an item from one job group to another
An item can be moved from one job group to another by simply clicking it, and then dragging it to the required job group.
Renaming a job/assigning a job to a different technician
The name and technician assignments against a job group can be changed by simply clicking the Job Name link in the job header (see the Job grouping screen elements explained section for details). This will open the same screen as in point C of the Creating a new job group instructions, and the details can be amended in the same way.
Removing an item from a job group
To remove an item from a job group, simply click the Delete Item button (see the Job grouping screen elements explained section for details), and then either click the OK Button to delete it, or the Cancel button to go back.
Deferring an entire job group
When a customer has been provided with an estimate for particular job, it may be that they want to proceed with parts of it, but defer others. For example, if the customer had come in to have new discs fitted, but during the process of this, it was found that the tyres with near the legal limit. The customer could choose to leave the tyres until a later date. The defer feature would allow the system to automatically send the customer a notification to remind them of the deferred work. The process to defer work is as follows:
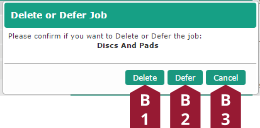
- One a job group has been added to the document, and then either a job or estimate generated, clicking the Delete button (see the Job grouping screen elements explained section for details) in the job header will trigger a prompt.
- In this prompt, clicking the Delete button (B1) will delete the whole job group, clicking the Defer button (B2) will defer the job, and clicking the Cancel button (B3) will not delete the item.
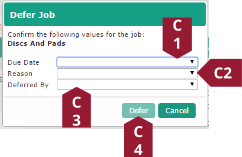
- Clicking the Defer button will cause a second prompt with several dropdown menus on it to pop up: Due Date (C1) sets the number of weeks to wait before sending a reminder to the customer, Reason (C2) sets the reason for the customer deferring the work (for example – a lack of funds), and Deferred By (C3) sets the operator who processed the transaction. Set all the dropdown menus to an appropriate setting, and then click the Defer (C4) button to defer the job group.
Please refer to the Deferred work section for further information on setting up and using this feature.